This sciatica problem I've been experiencing has really made me jumpy about lifting heavy things over my head. As a matter of fact the sciatica is sort of following the time frame when the Mistral Canoe took center stage. I have been using it exclusively since I bought it and have lifted it many times to my shoulders. I now have elected to avoid those lifts unless absolutely necessary. The only way to solve that situation is a canoe trailer. That's just what I bought.
The UKCT1 is a single canoe trailer that can be purchased from two different sites on line that I'm aware of. The cost of the trailer plus shipping to my door was just at $1000. It arrived in three boxes by UPS about two weeks after ordering. Below is a simplified description of the assembly process that took me five hours to complete. The finished product appears as the lead photograph for this entry. The first picture below show what it looks like disassembled after unpacking the parts.

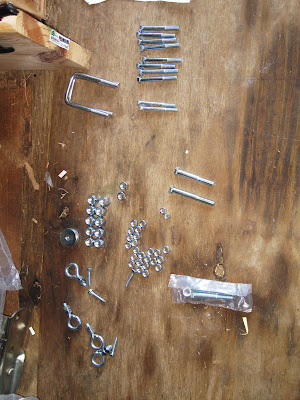
It is a good idea to go through the parts list to be certain that all the assembly hardware and parts were packaged. The packing slip included with the nuts and bolts had check marks after each and every piece. I like to see this as it indicates that someone actually did his job and thoroughly checked my parts. I will add here that the hardware is good quality stuff. The only complaint I do have is that the lock nuts are the type that have a little indentation on one of the flats that slightly disfigures the threads on the inside of the nut. These nuts turn onto the threaded bolts very, very hard. I sprayed each bolt with silicone spray as I tightened the nuts. I prefer nyloc lock nuts. It is what it is and that's my only gripe.
The first trailer part requiring assembly is the axle and spring combination. The springs are held to the top of the axle by U bolts and a square plate. The spring units have a 3/8" protrusion on their bottoms that fit into a hole in the top of the axle to assure perfect alignment. All I need do is install the U bolts, plate, nuts on top and tighten them down.
The trailer frame is then set on top the axle taking care to align the ends of the spring assemblies with the spring hangers on the bottom of the trailer framework. A bolt is inserted through the ends of each spring assembly and spring hanger. The attached springs are shown below:
The next assembly to install is the tongue assembly. I ordered a four foot extension piece that will slide into the existing standard tongue. That extension will be attached shortly after the main tongue is bolted in place.
The trailer is starting to take shape now. The photo above show the standard tongue only.
The main tongue is attached to a frame member located at the rear of the trailer carriage. Three heavy 3/8" U bolts guarantee solid, dependable attachment.
A welded round pin protrudes out of each side of the tongue to guarantee the tongue will not ever pull away from the trailer. It in essence, locks against the first U bolt as can be viewed below:
The four foot extension is slid inside the main tongue assembly and the ball hitch assembly is bolted onto the end of that. The hitch requires a 2" draw bar ball. She's a long one for sure!
The ball hitch with chain are top quality and very easily installed. Two 3/8" bolts hold the ball assembly onto the end of the tongue.
Another view is below: Oh; the little dog doesn't come with the parts. That's Happy...
It's time to install the fenders. They are plastic. I could have opted for metal but I was feeling cheap when I ordered this thing. They were very easy to install.
Both fenders are shown attached: (It appears that Happy is bored with this whole affair.)
The supports that the front and rear bunks attach to are next on the to do list. The rear supports are installed first and they attach at the extreme rear of the trailer frame. These supports are adjustable up and down and fore and aft. See photo above also.
The front bunk supports are next:
The bunks need to be centered on their respective supports and attached with lag bolts up through the support and into the bottom of the bunk. The rear one is installed first.
Now the front bunk is bolted in place:
Oh, my aching back! If my therapist finds out I did this today he'll kill me.
It's shaping up. Both bunks are in place and the trailer is nearing completion. Oh no! Not this! Yep; the lights need to go on. I loved installing these. Wiring trailers is one of my favorite things to do.
Great Scott!
If you look closely at the following picture you will see a wire passing through the center of the tongue from the rear of the trailer and pulled out through the front of the tongue. This is stiff hook up wire. The plug end of the wiring harness (goes to the truck) is attached to the hook up wire and pulled through the trailer tongue and out the other end. A foot and a half of wire will be left extended from the trailer ball clamp.
The tail lights are bolted to the back of the trailer and the wiring is tied with cables to the frame to neaten things up. I didn't go into a big explanation on the light installation because it is really easy to perform. The wiring harness comes out of the box attached to the tail lights and the marker lights. All I had to do was to bolt the tail light that had the brown and green wire to the right side of the trailer corner and the light with the red and yellow wires went to the opposite side. Done.
It's time to move along to the wheels and bearings. The axles both come with bearings installed and packed. The bearings are protected by a dust cover that will keep out dust and water. It is located dead center of the wheel.
Yes; I know the wheel (lug) nuts are not installed yet.
I am bearing minded when it comes to trailer wheels. I usually have my own bearings at least most of the time but, lets keep it mechanical here. I elected to remove the dust cover and install an apparatus that will allow greasing the wheel bearings with a grease gun. The dust cover is removed in the photo below: Oh, note that the lug nuts are in place. You thought I'd forget didn't you?
The replacement part for the dust cover I'm talking about is called a bearing buddy. There is a grease fitting in the center of the fixture. The bearing buddy is made of very high impact plastic and I pounded it in place with a dead blow hammer. That would be a soft hollow plastic hammer filled with lead shot to make it heavy. Anyway; the bearing buddy is shown below before installation.
Below; the bearing buddy is installed on the wheel:


That summarizes the build sequence. I have not tried the canoe on this trailer to test for fit. I'm sure I will have to reposition the bunks. There are a couple things I would have liked to have changed. One area I would change is the bunk height. I would like to see them higher. Some canoes have bows that project up (Prospector style) and since the canoe will be resting on it's gunnels and the tallest part of the canoe will now be on the bottom (upside down); the end of the canoe will be located in close proximity to the tongue. I'd like to see more clearance there. The other issue I have is with the tie down eye bolts. They are designed as lag bolts to be screwed into the wooden bunk. I personally will not trust my canoe strapped down to that type fastener. I will drill the trailer frame close to the bunks and insert threaded eye bolts with proper lock nuts and washers. Then I can drive along with peace of mind.. That's it. I hope you enjoyed the blog entry. It's not for everyone I guess but, I know someone out there is wondering about a canoe trailer. It will be with me on the next canoe outing so stay tuned in. Thanks for checking the blog. I appreciate you doing so.
THE FOLLOWING WAS POSTED TODAY APRIL 14
I attached the completed trailer to the truck and loaded the canoe onto the trailer. I noted some areas that needed change. Actually they demanded change.
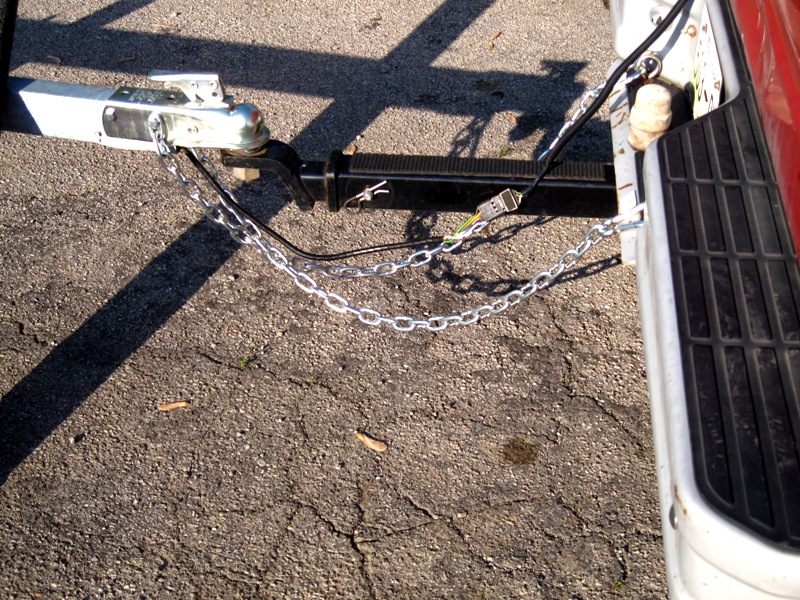
The first thing I attended to was buying a safety chain of the proper length. I use an extended draw bar and the chain that came with the trailer was too short. I purchased bulk chain and cut two 40" lengths and added hooks to the ends. That problem ended. Problem 2. The Mistral canoe has a prospector-ish fore and aft. When it is turned gunnel side down on the trailer, the nose of the canoe ended up below the drawbar. The bunks would have to be raised. See below how the Mistral rests on the bunk.
You can see in the above shot how the nose of the canoe is beside and below the draw bar. This is unacceptable. I changed that today. A close up is below.
I cut two inch angle iron to 18 inch lengths and bolted them to each side of the trailer tongue. An angle iron cross piece was bolted to the uprights and the bunk on top of that cross piece. The forward bunk is tougher than the trailer itself.
Above: I removed the 3/8" bolts that hold the extended tongue to the trailer and replaced them with threaded eye bolts. The tie down straps go through those eye bolts.
Above: I made the top angle iron almost the full length of the bunk to give support towards the ends. The canoe rests on the ends of the bunks until it can be lifted onto and slid across the bunks.
Finally the bunk is lagged onto the angle iron.
That is one strong bunk set up. I will eventually do the rear bunk the same way.
Below is the factory bunk for comparison. Quite a difference:
The trailer will work as is from the factory for any canoe other than a prospector. The bunks are too short for prospectors. It isn't difficult to raise the bunks and I would be not put off about buying this trailer over that one problem. This trailer is a solid piece of equipment and would be very easy to convert into a two canoe unit. By the way; if you have a puppy or two who love to chew on the ends of your bunk carpet; the answer to that problem is below. I cut and split two sections of plastic drain pipe and slid them over the bunks. See below:
The bunks are now puppy proofed. The picture above shows the rear bunk re-done exactly like the front. They are eighteen inches high (off the frame) The trailer's ready for use right now. Hopefully I can get the canoe in the water this weekend.


No comments :
Post a Comment
I appreciate your interest in my blog and welcome your comments